
How to use a custom domain from Wix with Proton Mail
- Reading
- 6 mins
- Category
- Domain setup
If you have a custom domain (like yourdomain.com) from Wix, you can use Proton Mail to send and receive emails using addresses like eric@yourdomain.com instead of eric@protonmail.com. Custom domains are available on all paid Proton Mail plans.
If you’re looking for general information about this feature, or want to set up a custom domain from a different provider, check out our general article on how to use a custom domain with Proton Mail.
- Before you get started
- Step 1: Connect and verify your domain
- Step 2: Set up custom domain addresses
- Step 3: Configure DNS records in Wix
Before you get started
If you’re on a Proton for Business plan, you’ll need to create your organization before you continue. Make sure you have enough seats (user licenses) to cover the number of custom domain email addresses you want to create.
Step 1: Connect and verify your domain
Note: The steps below apply only if your domain is connected to Wix via name servers (Wix’s default for domains purchased from Wix). If your domain is connected to Wix via pointing, or its name servers point to another service, add the same DNS records in that provider’s DNS management console instead of the Wix dashboard.
- Sign in to the Proton Mail web app (account.proton.me/mail) and open your account settings (Settings ⚙ → All settings).
- Select Domain names from the sidebar. Click Add domain.
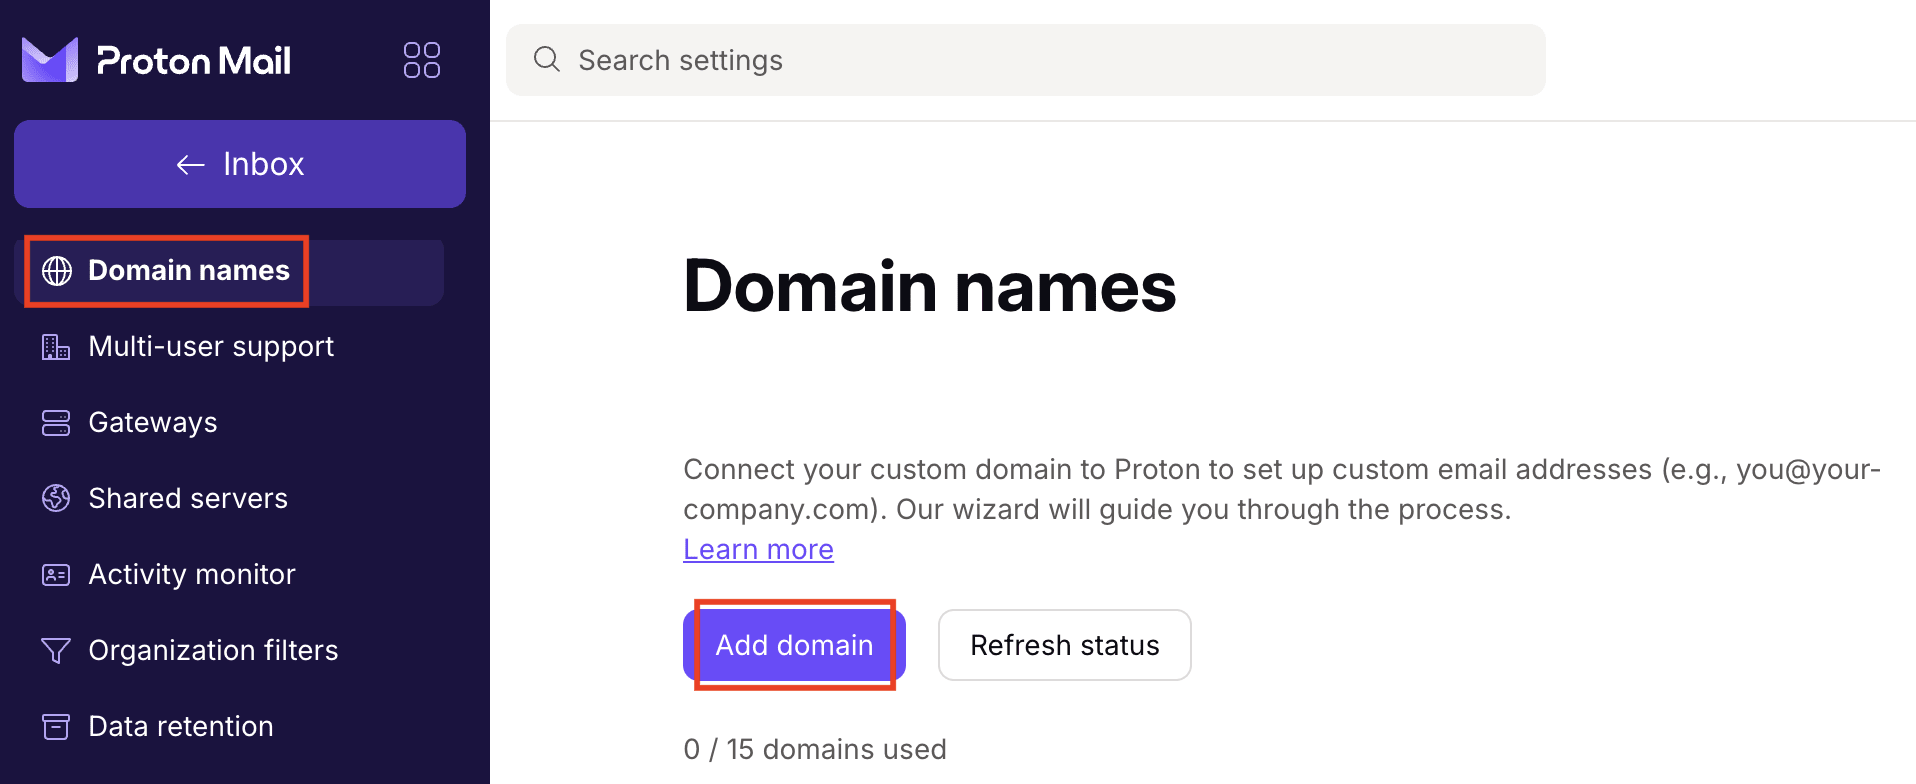
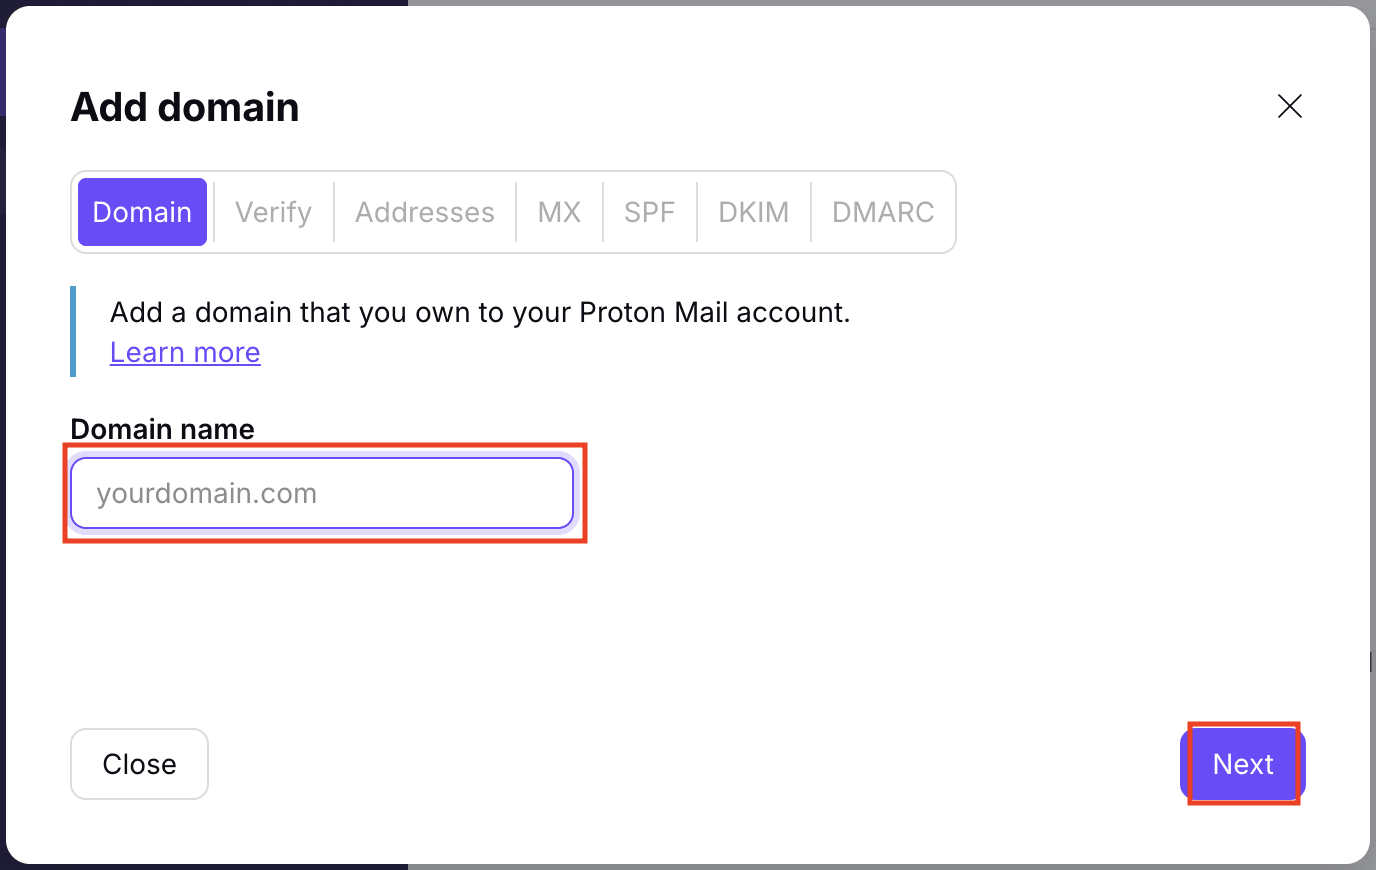
- Enter your Wix domain name and click Next.
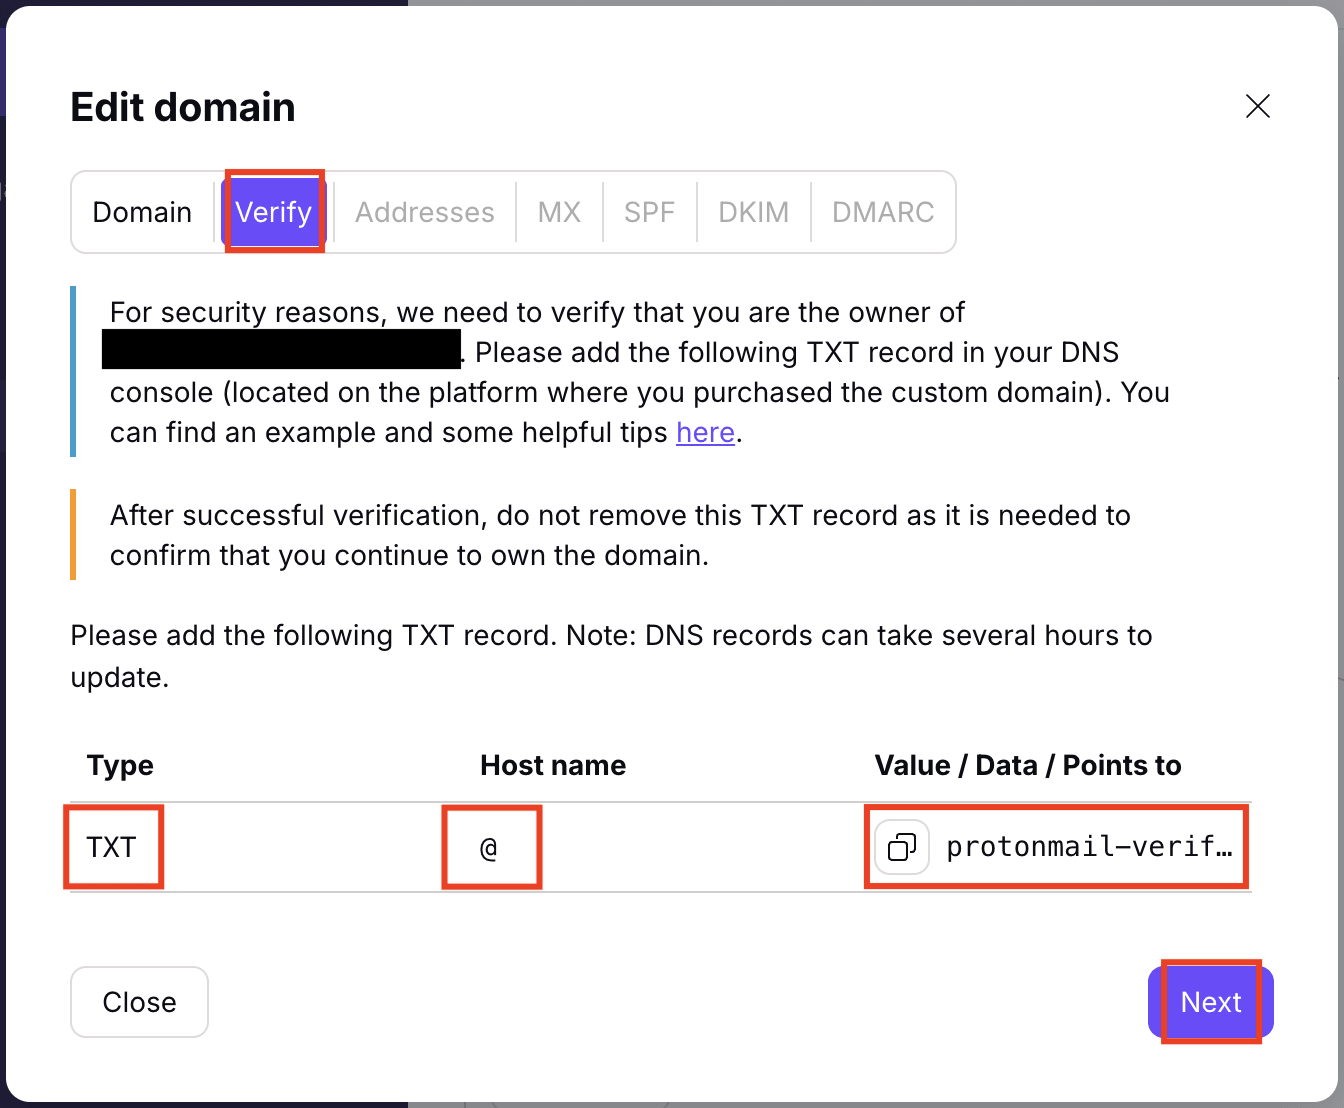
You’ll see a table containing a TXT record. Copy the value from the Value/Data/Points to column.
- Open a new browser tab, sign in to Wix, and go to Account Settings → Domains(new window).

- Click the Domain Actions icon (⋯) next to the domain you want to configure for Proton Mail, then select Manage DNS Records.

- Scroll to the TXT (Text) section and click + Add Record.
- Add the following record:
- Host Name: Leave this field blank (in Wix, you leave the Host Name empty instead of entering @).
- Value: Paste the Value you copied from Proton Mail.

Click Save, then click Save Changes in the pop-up message.
- Go back to the Proton Mail domain setup wizard and click Next.
We’ll check the TXT records for your domain. Once verified, you can move on to the next step.
Step 2: Set up custom domain addresses
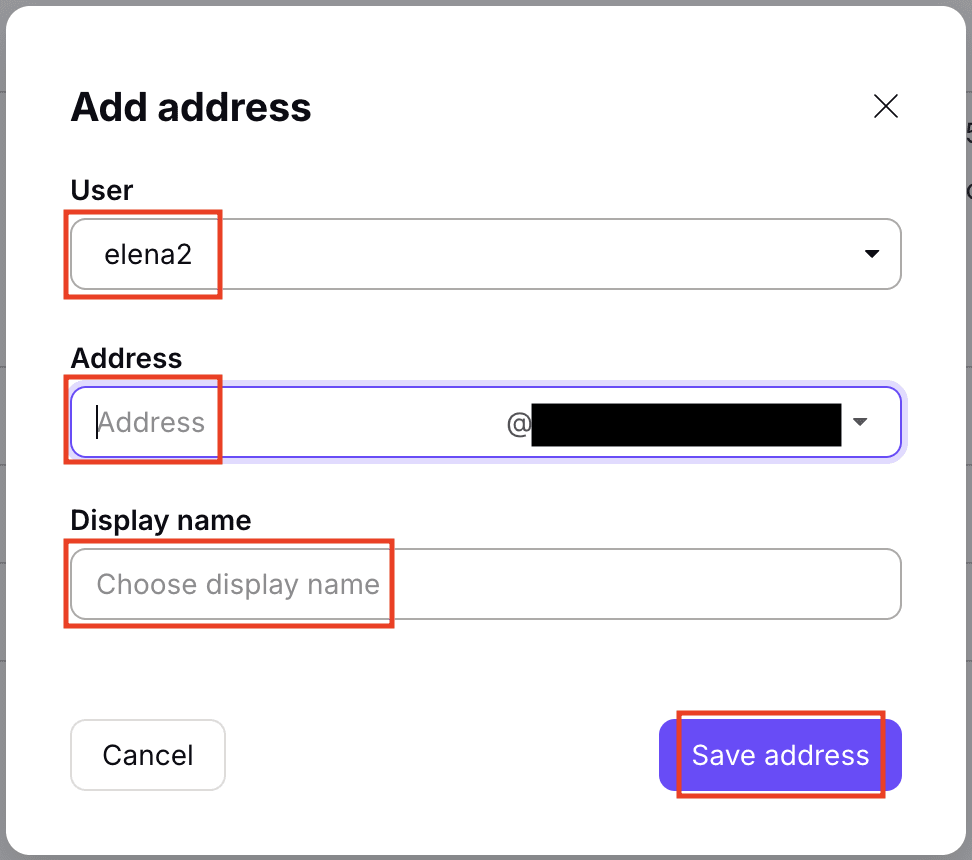
- In the Addresses tab of the Proton Mail domain setup wizard, click Add address.
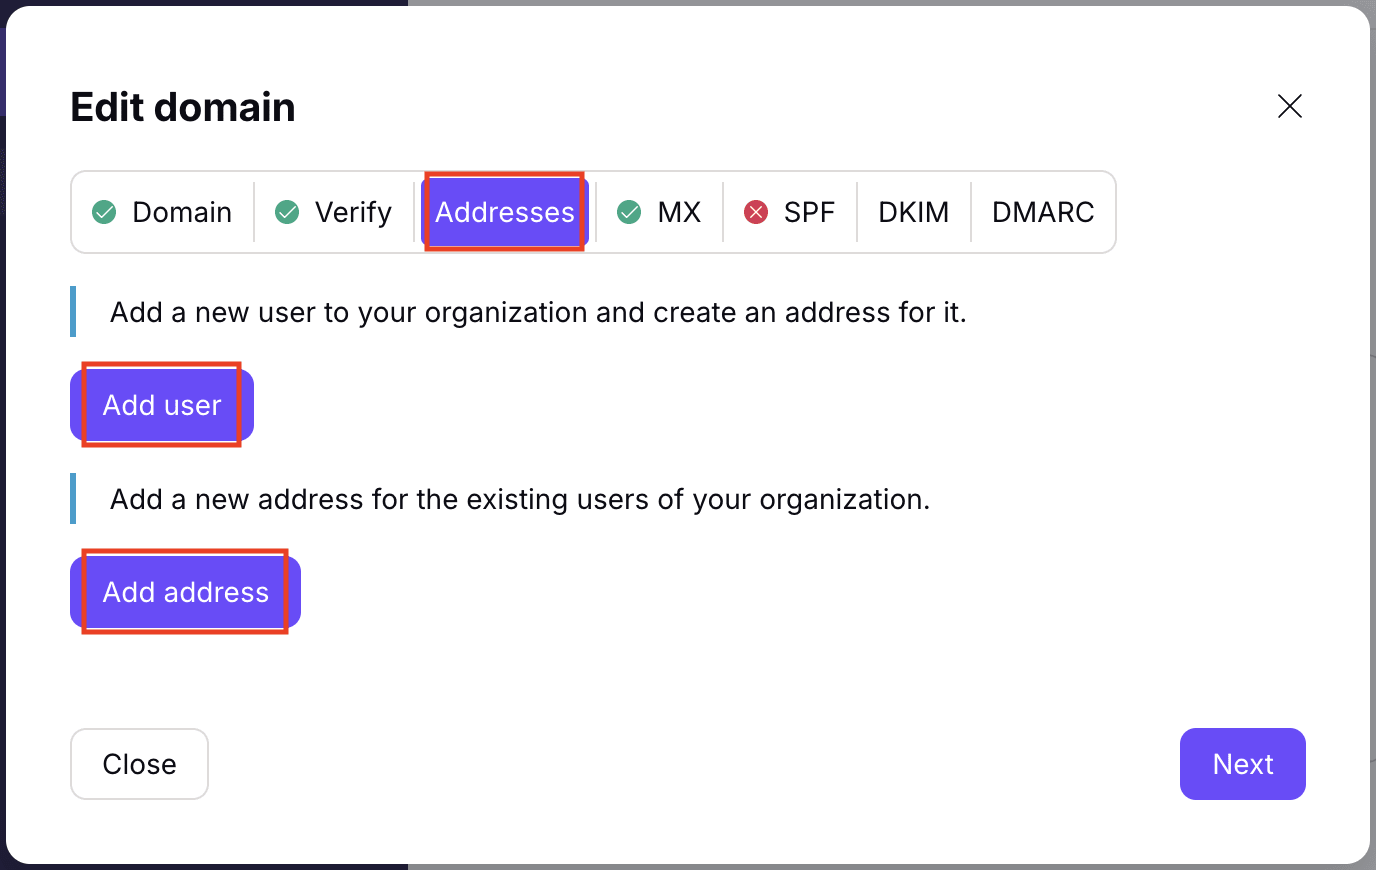
If you haven’t created your user accounts yet, click Add users. Learn how to add users to your Proton organization.
- Select the User this address is for, then enter their new Email address and Display name.
- Click Save address to confirm.
- Once you have created addresses for all of your users, inform them of the change and share their new sign-in details with them.
It’s important to do this before you configure DNS records in Wix. Once you change the MX records, their emails will be delivered to their new email addresses.
Step 3: Configure DNS records in Wix
Now your domain is verified and you’ve added all users and email addresses, it’s time to add more DNS records to Wix.
You’ll find the records you need to add in the MX, SPF, DKIM, and DMARC tabs of the Proton Mail domain setup wizard.

If you left setup, you can get back to this screen from your Proton Mail account settings. Select Domain names from the sidebar and click Review next to your domain.
- MX records tell the internet to direct your emails to Proton Mail. Once added, emails sent to addresses that don’t exist in Proton Mail won’t be delivered, because your domain will no longer route mail to your old server.
- SPF, DKIM, and DMARC records help protect your domain from spoofing and improve email deliverability. Without them, your messages may be rejected or sent to spam by major email providers like Gmail.
Here’s how to add DNS records in Wix:
Note: Unlike other providers, Wix uses a guided flow to add MX records, separate from its regular DNS editor. You’ll add the MX records first via Edit MX Records, then add the SPF, DKIM, and DMARC records via Manage DNS Records.
Open a new browser tab, sign in to Wix(new window) and go to the Domains(new window) page of your Wix account.
MX records (essential)
- Click the Domain Actions icon (⋯) next to the domain you want to configure for Proton Mail, then select Edit MX Records.
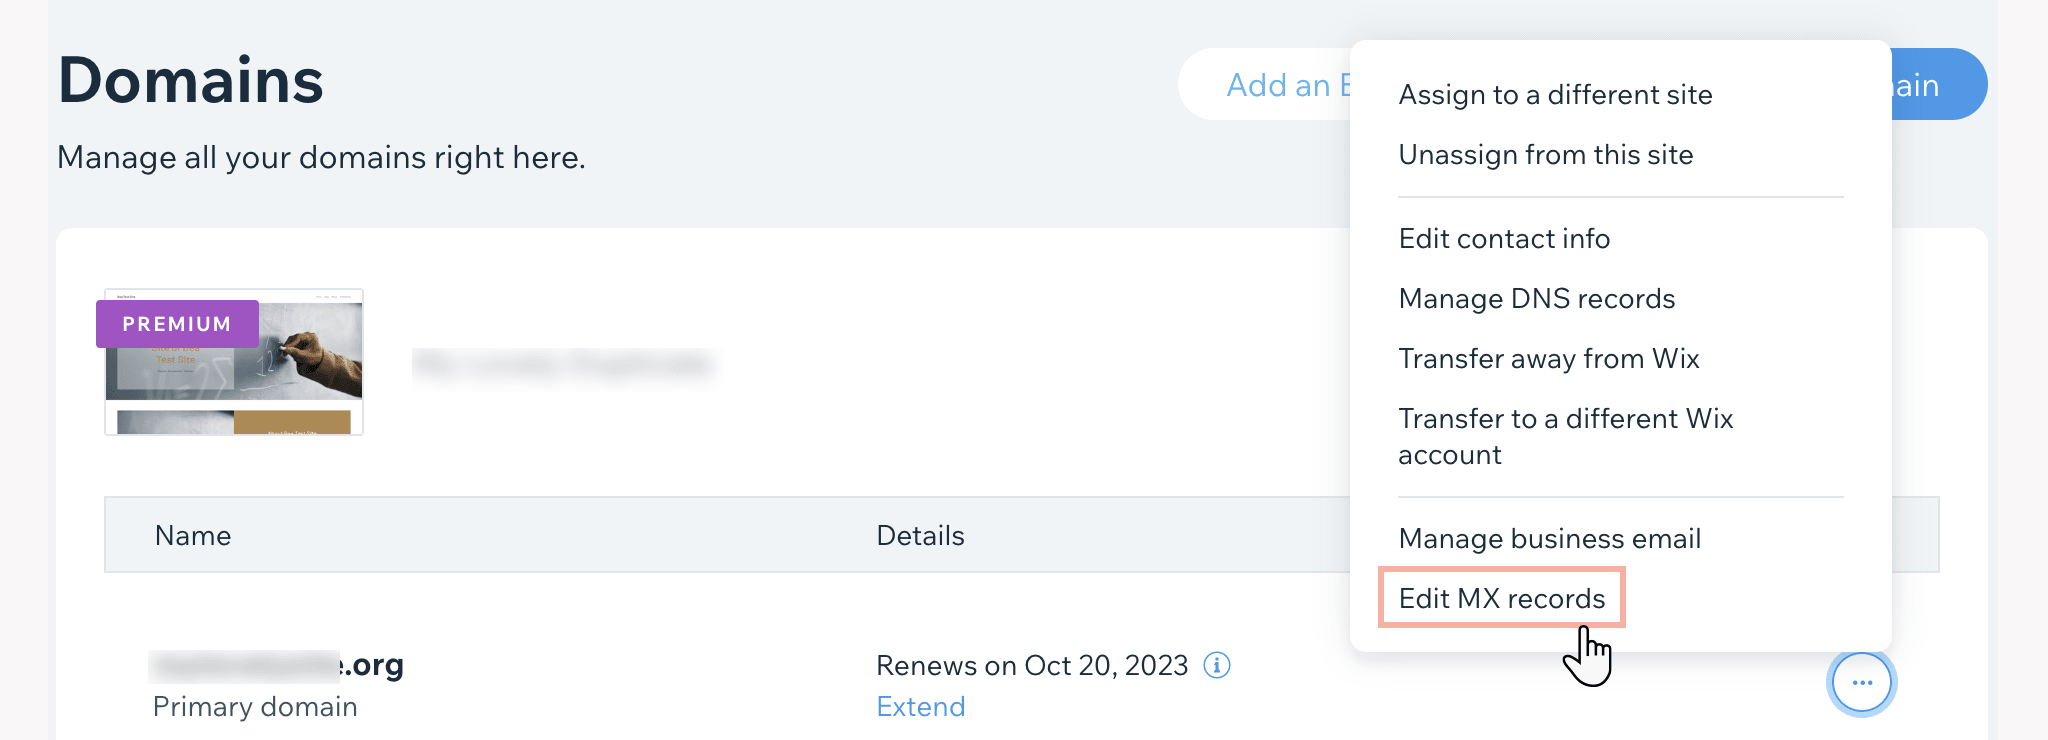
- Click the dropdown menu of email providers and select Other (provider not on the list). (If Proton Mail appears in the list of providers, you can select it and click Start Connecting — Wix will add our MX records for you, and you can skip to the SPF record below.)
- In the Points to field, enter the first Proton Mail mail server: mail.protonmail.ch
- Click + Add Another and enter the second Proton Mail mail server in the Points to field: mailsec.protonmail.ch
Important: In Wix, you can’t edit the Host Name or Priority fields for MX records — Wix assigns priorities automatically based on the order you enter them. Make sure you enter mail.protonmail.ch first and mailsec.protonmail.ch second, so mail.protonmail.ch gets the lower Priority value (a lower number indicates a higher priority).
- Click Connect Business Email to save.
If everything is set up correctly, you’ll see a green checkmark in the MX tab of Proton Mail’s domain setup wizard.
If it turns red, go back to Edit MX Records in Wix and remove any MX records from your previous email provider, or re-enter the Proton Mail servers in the correct order (mail.protonmail.ch(new window) first).
SPF record (highly recommended for security reasons)
- On the Domains(new window) page, click the Domain Actions icon (⋯) next to your domain and select Manage DNS Records.
- Scroll to the TXT (Text) section. (Note: Wix’s DNS editor also shows a dedicated SPF section. Ignore it and add the SPF record in the TXT (Text) section as described below.)
- If there’s already an existing SPF record, either delete it or change the Value to include: _spf.protonmail.ch ~all. Otherwise, click + Add Record.

- Add the following record:
- Host Name: Leave this field blank (instead of entering @)
- Value: v=spf1 include:_spf.protonmail.ch ~all
Click Save, then Save Changes.
Don’t leave the Domains(new window) page yet.
DKIM records (highly recommended for security reasons)
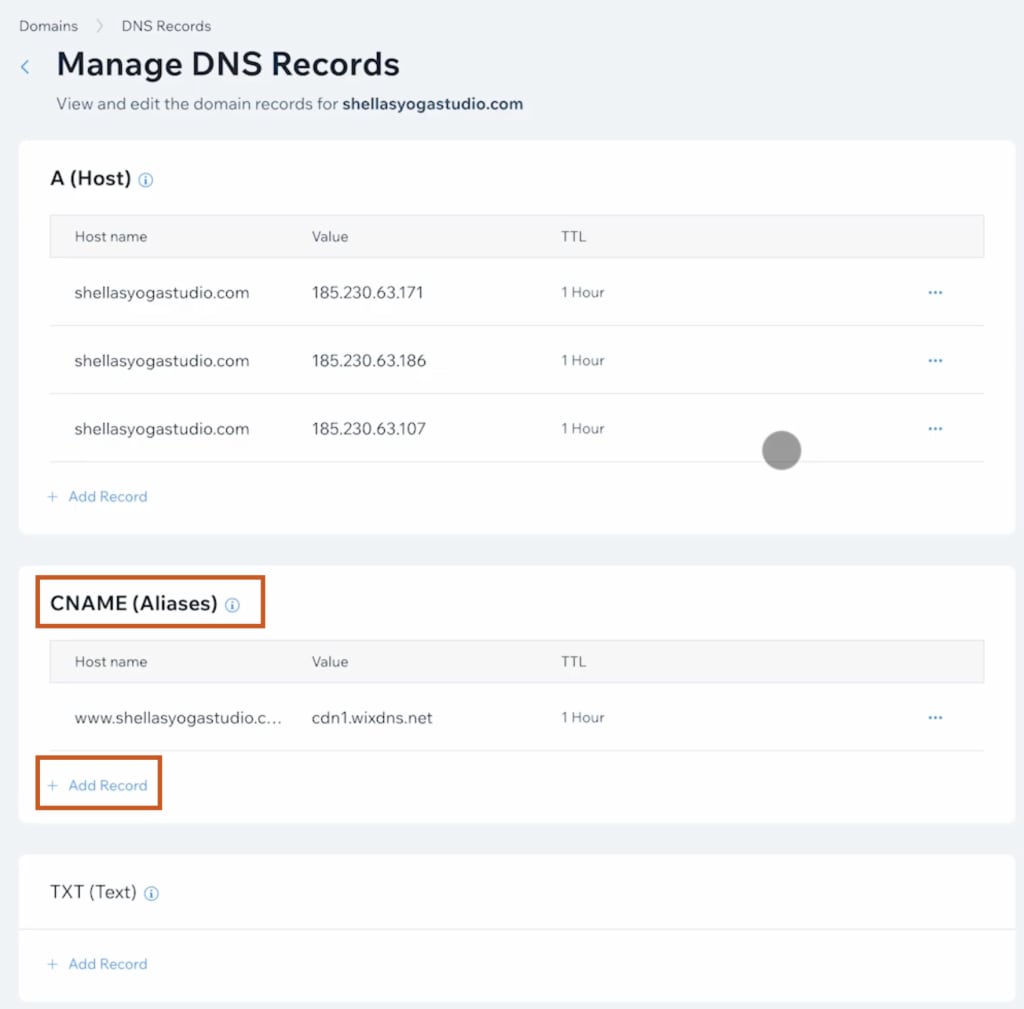
Scroll to the CNAME (Aliases) section.
First DKIM record
Click + Add record under CNAME (Aliases) and fill in this information:
- Host Name: protonmail._domainkey
- Value: Paste the Value/Data you copied from Proton Mail.
Click Save, then Save Changes.
Second DKIM record
Click + Add record under CNAME (Aliases) and fill in this information:
- Host Name: protonmail2._domainkey
- Value: Paste the Value/Data you copied from Proton Mail.
Click Save, then Save Changes.
Third DKIM record
Click + Add record under CNAME (Aliases) and fill in this information:
- Host Name: protonmail3._domainkey
- Value: Paste the Value/Data you copied from Proton Mail.
Click Save, then Save Changes.
Don’t leave the Domains(new window) page yet.
DMARC record (optional but recommended)
Scroll to the TXT (Text) section and click + Add Record.
Add the following record:
- Host Name: _dmarc
- Value: Copy and paste the value from the Value / Data / Points to entry in the DMARC tab.
The MX, SPF, DKIM, and DMARC tabs in the domain setup wizard should all have green checkmark icons next to them.

This means you can now send and receive emails using your custom domain addresses.
Note: DNS changes made in Wix can take up to 48 hours to propagate, although they usually take effect much sooner. If a tab in the domain setup wizard doesn’t show a green checkmark right away, check back later.